Programming Robotics Art

|

|

|
Background:
For this unit, our goal was to create a light/music show using the Arduino program. In order to do this, we also had to learn about the basics of electricity. In order to learn the basics, we spent a good portion of time setting up circuit and making observations about what different configurations did to change the brightness, resistance, or current in general.
Vocabulary:
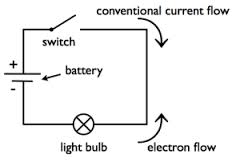
Circuit - a closed path made of conductive material through which a charge runs.
Parallel (in a circuit) - a closed electrical circuit in which the current is divided into two or more paths
Series (as in "in series") - An electric circuit connected so that current passes through each circuit element in turn without branching
Voltage - is electric potential energy per unit charge
Current - is a flow of electric charge. In electric circuits this charge is often carried by moving electrons in a wire. Measured in amps.
Resistance (electricity) - a measurement of the difficulty encountered by a power source in forcing electric current through an electrical circuit, and hence the amount of power lost in the circuit. Measured in ohms.
Breadboard - a board for making an experimental model of an electric circuit.
Programming - the action or process of writing computer program
Physics component:
We found out how to calculate the current of a circuit as well as it's voltage and resistance using a few simple formulas.
V=IR where I=current and R=resistance. This formula is known as Ohm's law.
R-total = R-1 + R-2 and so on where R-1 is one resistor and R-2 is another. Note: these resistors would be in series with each other.
To find the resistance of resistors in parallel to each other, one would use this formula: 1/R-total = 1/R-1 + 1/R-2 and so on.
Once you have found the total resistance of a circuit you simply plug it into the formula (assuming you know what voltage your battery or powers source is) and you have found the current of the circuit! Huzzah!
Kirchoff's law: says that the “total current or charge entering a junction or node is exactly equal to the charge leaving the node as it has no other place to go except to leave, as no charge is lost within the node“. In other words, the total sum of all the currents must be equal to zero.
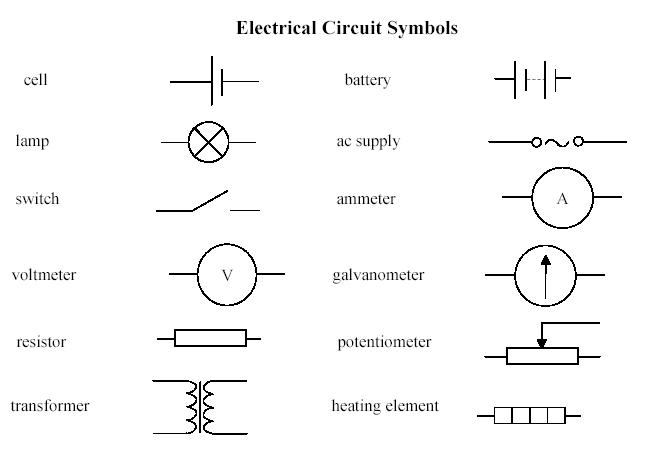
A list of definitions related to Electrical Circuit Symbols and a link to more definitions to the right:
For this unit, our goal was to create a light/music show using the Arduino program. In order to do this, we also had to learn about the basics of electricity. In order to learn the basics, we spent a good portion of time setting up circuit and making observations about what different configurations did to change the brightness, resistance, or current in general.
Vocabulary:
Circuit - a closed path made of conductive material through which a charge runs.
Parallel (in a circuit) - a closed electrical circuit in which the current is divided into two or more paths
Series (as in "in series") - An electric circuit connected so that current passes through each circuit element in turn without branching
Voltage - is electric potential energy per unit charge
Current - is a flow of electric charge. In electric circuits this charge is often carried by moving electrons in a wire. Measured in amps.
Resistance (electricity) - a measurement of the difficulty encountered by a power source in forcing electric current through an electrical circuit, and hence the amount of power lost in the circuit. Measured in ohms.
Breadboard - a board for making an experimental model of an electric circuit.
Programming - the action or process of writing computer program
Physics component:
We found out how to calculate the current of a circuit as well as it's voltage and resistance using a few simple formulas.
V=IR where I=current and R=resistance. This formula is known as Ohm's law.
R-total = R-1 + R-2 and so on where R-1 is one resistor and R-2 is another. Note: these resistors would be in series with each other.
To find the resistance of resistors in parallel to each other, one would use this formula: 1/R-total = 1/R-1 + 1/R-2 and so on.
Once you have found the total resistance of a circuit you simply plug it into the formula (assuming you know what voltage your battery or powers source is) and you have found the current of the circuit! Huzzah!
Kirchoff's law: says that the “total current or charge entering a junction or node is exactly equal to the charge leaving the node as it has no other place to go except to leave, as no charge is lost within the node“. In other words, the total sum of all the currents must be equal to zero.
A list of definitions related to Electrical Circuit Symbols and a link to more definitions to the right:
|
http://www.rapidtables.com/electric/electrical_symbols.htm
|
Project History:
My group's (only two people during this project) specific goal was to program a song to play through the buzzer while simultaneously playing LED lights to the tempo of the song. We hoped to play the lights at the exact same time as the notes. In order to do this we had to play with some of the present programs in the Arduino and combine some of them. We ended up playing Darude Sandstorm (Indiana Jones, anyone?) and Careless Whisper while having 8 LED lights blink at the same time as the notes were played. It was pretty rad.
We encountered some problems when we were combining the code because at first the LEDs would not blink while the buzzer would play. And then we had to figure out how to get the lights to blink with the notes, and that was the most challenging problem we faced. I now know that too much current will blow out LED bulbs. Too keep this from happening resistors can be used.
I learned a lot of things about coding. For example, I can now tell you that Int stands for integer and defines something permanently in code. Also Void Loop is where the majority of code goes and will play the sequence multiple times. ARDUINO PINS are very important. For example, in order for the computer to be able to send current to the LED lights, you need to include the correct pins in the code. If the LEDs go to pins 2,3,4,5,6,7, and 8 then if the computer only recognizes 1,2,3,4,5, and 6 the LEDs won't light up because current won't be flowing through those pins not included in the code.
Reflection:
Some of the best things about this unit include the fact that I had very little knowledge about electricity and had absolutely no experience with coding or programming anything ever. Because of this, the unit was very fascinating and informative. Fortunately for me, the Arduino program my teacher had us use was a full tutorial that taught us as we moved forward.
The things that went poorly for me during this unit were a result of my own faults. I lost concentration when I realized that my partner had coding experience and could read music (I do not have this skill which made me very useless). My partner was moving through the Arduino program faster than I could understand and I felt like I should really let her do her thing since she was doing well and benefiting me as well. Not a good move in hindsight. I got a little too lackadaisical and passive about this project.
I did get to redeem myself a little bit when my partner went to New York for a week and I was left with our partially completed presentation. I spent that week making sure I understood the coding and adding on to it so that I would be prepared to present the entire thing with or without my partner.
After the completion of this unit, I have learned a few things about myself. It is hard for me to work on something when I do not feel like I have any reason to. Well, actually, that only applies when I have no real passion for the activity I would be doing...and sorry, Mr. Williams, coding is just not my thing. Still, there were many things about my work ethic that could have been improved. One of these things would have to be my own passiveness regarding the pace we were moving at. It would have been better for me to slow down my partner so that I could have really understood the material so I could work more easily on the coding myself.
|
|
|
